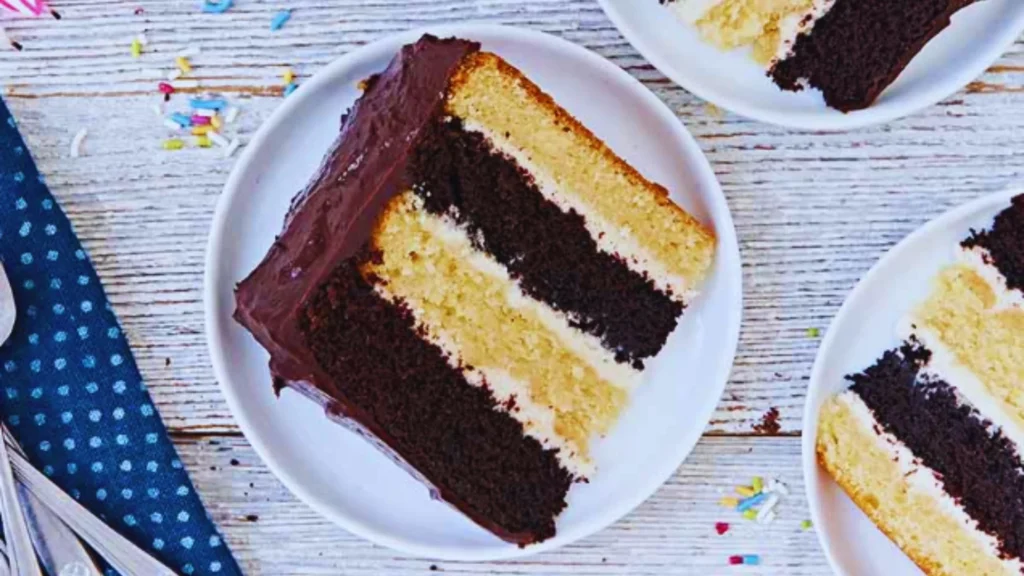
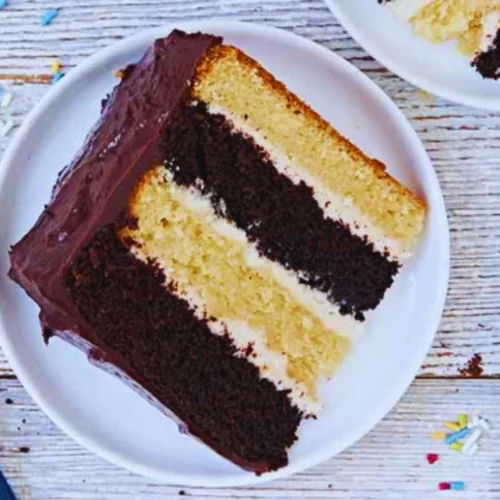
Chocolate vanilla layer cake is a rich, moist dessert made by combining layers of soft vanilla cake and deep, flavorful chocolate cake.
This chocolate vanilla layer cake tastes incredibly delicious due to its tender crumb, buttery texture, and perfectly balanced sweetness.
I made this chocolate vanilla layer cake after seeing a beautiful homemade version in a baking show that truly inspired me.
The main specialty of this chocolate vanilla layer cake is the contrast of flavors and colors in every slice, offering a classic duo that pleases everyone.
Now I will show step-by-step how this chocolate vanilla layer cake was made from scratch.
Chocolate Vanilla Layer Cake
This chocolate vanilla layer cake is a beautifully balanced, indulgent dessert featuring rich layers of both chocolate and vanilla cake, stacked together with a fluffy vanilla buttercream filling and finished with a smooth chocolate frosting.
The vanilla layers are soft, buttery, and lightly sweet, made with Greek yogurt and oat milk for extra moisture. The chocolate layers are deep, dark, and enhanced with Dutch cocoa and espresso powder for bold flavor.
Each bite delivers the perfect mix of light vanilla and rich chocolate. This chocolate vanilla layer cake is homemade from scratch and ideal for celebrations, birthdays, or simply satisfying a layered cake craving.
How To Prepare Chocolate Vanilla Layer Cake?
Prep Time: 35 minutes
Cooking Time: 35 minutes
Total Time: About 1 hour 15 minutes
Course: Dessert
Cuisine: American
Yield: 14 slices
Kitchen Utensils
- 3 8-inch round cake pans
- Mixing bowls
- Electric mixer or stand mixer
- Measuring cups and spoons
- Rubber spatula
- Whisk
- Cooling rack
- Cake leveler or serrated knife
- Offset spatula or cake knife
- Sifter (for sugar)
Ingredients
Vanilla Cake Layers
- ¾ cup Greek yogurt
- ½ cup vegetable oil
- ½ cup butter, softened
- 1 cup oat milk
- 1 tbsp vanilla extract
- 6 large eggs, room temperature
- 2¾ cups all-purpose flour
- 3 tbsp cornstarch
- 2¼ cups granulated sugar
- 4 tsp baking powder
- ½ tsp salt
Chocolate Cake Layer
- 1⅓ cups King Arthur Unbleached All-Purpose Flour
- ½ cup Dutch-process cocoa powder
- 1¼ tsp baking powder
- 2 tsp espresso powder
- ¼ tsp baking soda
- ½ tsp salt
- 2 tbsp cornstarch
- 1⅓ cups granulated sugar
- 2 tsp vanilla extract
- 3 large eggs, room temperature
- ½ cup vegetable oil
Filling
- 11 tbsp unsalted butter, softened
- 2–3 tbsp milk
- ¼ tsp salt
- 1 tbsp vanilla extract
- 4 cups confectioners’ sugar, sifted
Frosting
- 1½ cups unsalted butter, softened
- 4 cups powdered sugar
- 2 tsp vanilla extract
- ¼ cup cocoa powder
- 3–4 tbsp milk or heavy cream
- Pinch of salt
Instructions
1. Preheat the Oven & Prepare Your Pans
Set your oven to 350°F (175°C). Grease and line three round cake pans with parchment paper—two for the vanilla layers and one for the chocolate layer. Set aside.
2. Mix the Vanilla Cake Batter
In a large mixing bowl, whisk together Greek yogurt, vegetable oil, softened butter, oat milk, and vanilla extract until smooth. Add the eggs one at a time, mixing well after each.
3. Combine Vanilla Dry Ingredients
In another bowl, stir together flour, cornstarch, sugar, baking powder, and salt. Gradually add this dry mix to your wet ingredients, stirring just until combined. Try not to overmix.
4. Bake the Vanilla Layers
Divide the vanilla batter evenly between the two prepared pans. Tap each pan gently on the counter to release any air bubbles. Bake for 30–35 minutes, or until a toothpick comes out clean. Let cakes cool in their pans for about 10 minutes, then turn them out onto a wire rack to cool completely.
5. Make the Chocolate Cake Batter
In a clean bowl, whisk together flour, cocoa powder, baking powder, baking soda, espresso powder, cornstarch, salt, and sugar. Add the eggs, vanilla, and vegetable oil, and stir until smooth and well combined.
6. Bake the Chocolate Layer
Pour the chocolate batter into the third prepared pan. Bake for 30–35 minutes. Let it cool in the pan for 10 minutes, then transfer it to a wire rack to finish cooling.
7. Prepare the Filling
In a medium bowl, beat softened butter until light and fluffy. Add milk, vanilla, and a pinch of salt. Gradually mix in sifted powdered sugar until you have a light, creamy filling. Add a splash more milk if needed for spreading consistency.
8. Make the Frosting
Beat butter until creamy and smooth. Slowly add powdered sugar, then mix in cocoa powder, vanilla, and a pinch of salt. Add milk or cream a tablespoon at a time until your frosting is soft and spreadable.
9. Level the Cakes
If your cake layers have domed tops, use a serrated knife or cake leveler to trim them flat. This helps the layers stack evenly.
10. Assemble the Cake
Place one vanilla layer on your serving plate or cake stand. Spread a layer of filling over the top. Add the chocolate layer, spread more filling, then finish with the second vanilla layer on top.
11. Frost the Cake
Start with a thin crumb coat (a light layer of frosting) all around the cake. Chill for 15 minutes to set. Then apply the final, thicker layer of frosting using an offset spatula. Smooth it out or go for a rustic finish—your call!
12. Decorate & Serve
Finish it off with your favorite touches—sprinkles, chocolate curls, or piped frosting. Chill the cake for at least 30 minutes before slicing for clean cuts. Serve and enjoy every bite!
Note: Using oat milk and Greek yogurt adds moisture and subtle tang to the cake. Espresso powder enhances the chocolate flavor optional but recommended. For a more pronounced chocolate taste, increase cocoa powder in frosting slightly.
Nutrition Facts Of Chocolate Vanilla Layer Cake
| Nutrition | Amounts |
|---|---|
| Calories | 580 |
| Total Fat | 34g |
| Saturated Fat | 15g |
| Cholesterol | 120mg |
| Sodium | 270mg |
| Carbohydrates | 65g |
| Sugar | 50g |
| Protein | 6g |
Why You’ll Love This Recipe
You’ll love this chocolate vanilla layer cake because it brings together two classic flavors vanilla and chocolate in one stunning cake. Each bite delivers a perfect balance of light, fluffy vanilla layers paired with rich, moist chocolate, creating a delightful taste experience.
The chocolate vanilla layer cake is easy to make, with straightforward steps that anyone can follow, even if baking isn’t your usual hobby. Plus, it’s versatile enough to enjoy for celebrations or simple treats.
The creamy filling and smooth frosting add just the right touch of sweetness, making every slice feel special and satisfying. This chocolate vanilla layer cake is sure to become a favorite.
Why My Recipe Works
My chocolate vanilla layer cake works because it carefully balances ingredients to create a moist, tender cake with rich flavors. Using Greek yogurt and oat milk adds moisture without heaviness, while the combination of baking powder and cornstarch helps achieve a light, delicate crumb.
The espresso powder in the chocolate layer intensifies the cocoa flavor without tasting bitter. The frosting and filling are whipped just right to complement the cake’s texture without being too sweet or heavy.
Every step is designed to ensure consistent results, making this chocolate vanilla layer cake dependable whether you’re an experienced baker or trying it for the first time.
Expert Tips And Tricks
1. Bring eggs, butter, and milk to room temperature before starting. This helps the ingredients blend smoothly, creating a uniform batter and ensuring the cake rises evenly without dense spots.
2. Always sift flour, cocoa powder, baking powder, and cornstarch together. Sifting removes lumps and incorporates air, which helps the cake layers bake light and fluffy with an even texture.
3. Mix the batter just until the ingredients are combined. Overmixing develops gluten in the flour, resulting in a dense, tough cake rather than a soft, tender crumb.
4. Grease the cake pans well and line the bottoms with parchment paper. This prevents sticking and allows for easy removal, giving you perfectly shaped, smooth cake layers.
5. Let the cake layers cool completely on wire racks before applying filling and frosting. Warm cake causes buttercream to melt, leading to a messy finish and uneven frosting.
5. Add a small amount of espresso powder to the chocolate cake batter. It intensifies the chocolate’s richness without adding any coffee taste, making the chocolate layers more flavorful and vibrant.
Additions And Substitutions
Additions
- Fresh Berries – Add raspberries or strawberries between layers for a fresh, tangy contrast.
- Chopped Nuts – Sprinkle toasted pecans or walnuts in the filling for extra crunch and flavor.
- Chocolate Chips – Mix mini chocolate chips into the chocolate batter for bursts of melty chocolate.
- Flavored Extracts – Add almond or orange extract to the vanilla batter or frosting for a subtle twist.
- Caramel Drizzle – Drizzle homemade or store-bought caramel sauce over the finished cake for added richness.
Substitutions
- Oat Milk → Use whole milk or any plant-based milk like almond or soy milk.
- Greek Yogurt → Substitute with sour cream or buttermilk to maintain moisture and tanginess.
- Vegetable Oil → Replace with melted coconut oil or light olive oil for a different flavor profile.
- All-Purpose Flour → Use a gluten-free flour blend for a gluten-free version of the cake.
- Unsalted Butter → Swap with salted butter but reduce added salt in the recipe slightly to balance flavor.
Can I Prepare The Cake Layers In Advance?
Absolutely! To save time, you can bake the cake layers a day or two ahead. Once cooled, wrap each layer tightly in plastic wrap and store them at room temperature.
For longer storage, refrigerate them for up to 5 days or freeze for up to 3 months. Before assembling, allow the layers to come to room temperature to ensure even frosting application.
What Are Some Creative Decoration Ideas For This Cake?
Enhance the cake’s appearance by decorating it with fresh berries, edible flowers, or chocolate shavings. You can also pipe decorative borders or rosettes using the frosting to add a professional touch.
For a festive look, consider adding sprinkles or themed toppers to match the occasion. These decorative elements not only beautify the cake but also add a personal flair.
Can I Use A Different Frosting Instead Of Chocolate Buttercream?
Certainly! While chocolate buttercream complements the cake’s flavors, you can opt for alternatives like cream cheese frosting, whipped cream, or a simple glaze.
Each option will impart a unique taste and texture to the cake. For instance, cream cheese frosting adds a tangy richness, while whipped cream offers a light and airy finish.
Storage Instructions
Store the chocolate vanilla layer cake covered tightly with plastic wrap or in an airtight container to keep it fresh. It can be kept at room temperature for up to two days if your kitchen is cool.
For longer storage, refrigerate the cake for up to five days, but bring it to room temperature before serving for the best texture and flavor.
If you want to store it even longer, wrap the cake layers separately in plastic wrap and aluminum foil, then freeze for up to three months. Thaw in the fridge overnight before assembling and frosting.
Conclusion
This chocolate vanilla layer cake is a simple and tasty way to make a show-stopping dessert at home. The recipe uses easy-to-find ingredients and straightforward steps, making it perfect for bakers of all levels.
I encourage you to try this chocolate vanilla layer cake and experience the delicious mix of rich chocolate and creamy vanilla flavors.
After baking, you’ll enjoy sharing this delightful treat with loved ones and creating sweet memories together. I’m sure you’ll love how satisfying and rewarding this chocolate vanilla layer cake turns out!
More Mind-Blowing Vanilla Cakes to Make
Cherry Vanilla Cake Recipe – Sweet And Creamy
Vanilla Cake With Mousse Filling [Easy Recipe]
Vanilla Mayonnaise Cake Recipe | Fluffy And Delicious
Sourdough Vanilla Cake Recipe [Starter Discard]
Best Vegan Vanilla Cake Recipe [With Frosting]
Chocolate Vanilla Layer Cake
Equipment
- 3 8-inch round cake pans
- Mixing bowls
- Electric mixer or stand mixer
- Measuring cups and spoons
- Rubber spatula
- Whisk
- Cooling rack
- Cake leveler or serrated knife
- Offset spatula or cake knife
- Sifter (for sugar)
Ingredients
Vanilla Cake Layers
- ¾ cup Greek yogurt
- ½ cup vegetable oil
- ½ cup butter softened
- 1 cup oat milk
- 1 tbsp vanilla extract
- 6 large eggs room temperature
- 2¾ cups all-purpose flour
- 3 tbsp cornstarch
- 2¼ cups granulated sugar
- 4 tsp baking powder
- ½ tsp salt
Chocolate Cake Layer
- 1⅓ cups King Arthur Unbleached All-Purpose Flour
- ½ cup Dutch-process cocoa powder
- 1¼ tsp baking powder
- 2 tsp espresso powder
- ¼ tsp baking soda
- ½ tsp salt
- 2 tbsp cornstarch
- 1⅓ cups granulated sugar
- 2 tsp vanilla extract
- 3 large eggs room temperature
- ½ cup vegetable oil
Filling
- 11 tbsp unsalted butter softened
- 2 –3 tbsp milk
- ¼ tsp salt
- 1 tbsp vanilla extract
- 4 cups confectioners’ sugar sifted
Frosting
- 1½ cups unsalted butter softened
- 4 cups powdered sugar
- 2 tsp vanilla extract
- ¼ cup cocoa powder
- 3 –4 tbsp milk or heavy cream
- Pinch of salt
Instructions
Preheat the Oven & Prepare Your Pans
- Set your oven to 350°F (175°C). Grease and line three round cake pans with parchment paper—two for the vanilla layers and one for the chocolate layer. Set aside.
Mix the Vanilla Cake Batter
- In a large mixing bowl, whisk together Greek yogurt, vegetable oil, softened butter, oat milk, and vanilla extract until smooth. Add the eggs one at a time, mixing well after each.
Combine Vanilla Dry Ingredients
- In another bowl, stir together flour, cornstarch, sugar, baking powder, and salt. Gradually add this dry mix to your wet ingredients, stirring just until combined. Try not to overmix.
Bake the Vanilla Layers
- Divide the vanilla batter evenly between the two prepared pans. Tap each pan gently on the counter to release any air bubbles. Bake for 30–35 minutes, or until a toothpick comes out clean. Let cakes cool in their pans for about 10 minutes, then turn them out onto a wire rack to cool completely.
Make the Chocolate Cake Batter
- In a clean bowl, whisk together flour, cocoa powder, baking powder, baking soda, espresso powder, cornstarch, salt, and sugar. Add the eggs, vanilla, and vegetable oil, and stir until smooth and well combined.
Bake the Chocolate Layer
- Pour the chocolate batter into the third prepared pan. Bake for 30–35 minutes. Let it cool in the pan for 10 minutes, then transfer it to a wire rack to finish cooling.
Prepare the Filling
- In a medium bowl, beat softened butter until light and fluffy. Add milk, vanilla, and a pinch of salt. Gradually mix in sifted powdered sugar until you have a light, creamy filling. Add a splash more milk if needed for spreading consistency.
Make the Frosting
- Beat butter until creamy and smooth. Slowly add powdered sugar, then mix in cocoa powder, vanilla, and a pinch of salt. Add milk or cream a tablespoon at a time until your frosting is soft and spreadable.
Level the Cakes
- If your cake layers have domed tops, use a serrated knife or cake leveler to trim them flat. This helps the layers stack evenly.
Assemble the Cake
- Place one vanilla layer on your serving plate or cake stand. Spread a layer of filling over the top. Add the chocolate layer, spread more filling, then finish with the second vanilla layer on top.
Frost the Cake
- Start with a thin crumb coat (a light layer of frosting) all around the cake. Chill for 15 minutes to set. Then apply the final, thicker layer of frosting using an offset spatula. Smooth it out or go for a rustic finish—your call!
Decorate & Serve
- Finish it off with your favorite touches—sprinkles, chocolate curls, or piped frosting. Chill the cake for at least 30 minutes before slicing for clean cuts. Serve and enjoy every bite!
Notes
Nutrition Facts Of Chocolate Vanilla Layer Cake
| Nutrition | Amounts |
|---|---|
| Calories | 580 |
| Total Fat | 34g |
| Saturated Fat | 15g |
| Cholesterol | 120mg |
| Sodium | 270mg |
| Carbohydrates | 65g |
| Sugar | 50g |
| Protein | 6g |

Hi! I’m Sophia, your trusted cake guide with years of hands-on baking experience. I’m passionate about creating delicious and wholesome cakes that bring happiness to every occasion and home. Whether you’re a beginner or seasoned baker, I’m here to share tips, recipes, and inspiration to make your baking journey enjoyable and rewarding. From classic flavors to healthy twists, my goal is to help you discover the joy of baking and sharing beautiful cakes with family and friends.